How to Configure the Format of the Inventory Export File to Send to your Website
Your website managers will inform you what file type (XLS, etc.) you need to provide for them to import your inventory and they will also indicate what columns should be included. The instructions may be strict, in the sense that you must provide all columns with the exact column names requested and in the exact order specified; or they may be less strict, such as letting you leave out non-essential columns, and arranging the columns in a different order.
From the Inventory Reports by Style Screen, if you choose Full Selection and you choose the Web Export option, you can check the Config Export box so that when you choose Start Report you can modify the layout of the Inventory Export Files for websites.
![]()

In addition to Shopkeeper already simultaneously creating five different file formats of the export file (XLS, CSV, XML, two TXT layouts), this configuration step allows you to select and customize the columns to be included in those export files
You do not have to choose Config Export each time you create an export file for your website. Only check this box the first time you do an export or when you need to make modifications.
The Selected Fields area on the right is the list of columns that you have chosen to be included in the export file. By default, over 150 such columns are selected, but it's likely that most of them will be blank for most items.
 You can remove fields from the export files by selecting a field on the right and choosing the blue Move Left arrow
 ![]() or you can simply double-click the field.
or you can simply double-click the field.
That field is moved to the Available Fields list on the left. Any fields on the left are not included in the export file, but they can be moved to the Selected Fields list by clicking the field and then the blue Move Right arrow, or by double-clicking the field.
If you want just a small number of fields in the export file, you could move all fields at once to the unselected list on the left by clicking the blue Doubled Move Left arrow ![]() then individually move a small number of fields to the Selected Fields list, perhaps Style, Mfg, Descript, Price, Picture1, Picture 2.
then individually move a small number of fields to the Selected Fields list, perhaps Style, Mfg, Descript, Price, Picture1, Picture 2.
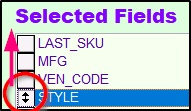
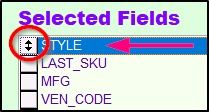
You can change the order of the columns in the export files by dragging up or down the gray drag box by each field name.


At the bottom, you can read a slightly longer description of the contents of each data field and you can also change the name of each field's column header that will be used in the export file.

![]()
For example, the field called DESCRIPT is a combination of the two basic 25-character description lines for each inventory item. By Default, if selected, that column in the export file will use that same name, DESCRIPT as the column heading. However, your website manager may request that this column be called Description or ItemDescription.
The Data Type is for your information and is not modifiable. If it starts with a C, that indicates the column is for text - which can be any combination of letters numbers or symbols. N indicates a Number, and the following number indicates how wide that column is. E.g. C16 indicates a text column of up to 16 characters.

Note that the expandable inventory notes boxes may require up to 30 columns. That is because many file types or systems cannot accept more than 254 characters per column. E.g. if you have many extended inventory Notes of over 600 letters, and you want them in the export file, you should include columns DETAIL1, DETAIL2 and DETAIL3 as that would include up to the first 762 characters of the extended notes of the inventory items.
If your website manager wants them all in one column, they'll have to pre-process the export file.
Hopefully the brief field descriptions of each column will help you identify the contents, but it is important to further explain the BRANDSTYLE column which is the combination of the 3-character Manufacturer Code, a slash, and the Vendor Style Number, e.g. STU/1275-AB57. This is a key column because in many cases this will be the primary Item ID to be used on the website.
To recap: when you restock styles in Shopkeeper, the newly received item will typically get a new Sku number because that lets you track the different dates, invoices, prices, costs, and, sometimes, slightly different weights. However, the inventory website export summarizes the output to just one line per style, no matter how many Sku's you might have had or still have in stock. For example, if you currently have in stock three of the same bracelet, received on three different invoices, each will have a unique Sku number, but you would not want three different items listed on the website.
The website export file does offer the option of the column LAST_SKU, but this is less likely to be the one you export as the websites ID Number of the item. Instead, in most cases, you'll want to choose the BRANDSTYLE column for that, though you probably will need to give it a new Preferred Export Field Name.
Even though over 150 standard Shopkeeper columns are available to be included in the export file, some website managers may request export files with many other esoteric columns, for example, StrapColor, which Shopkeeper does not have and which you most likely don't need.
 The export screen includes over 100 fields called _OTHER1 . . . _OTHER110, which you can include in the export file as placeholder columns and which will contain no data. As with any of the columns, you can change the column name in the export file by typing a new Preferred Export Field Name.

If you have the Maintenance Plan, you have additional ways of using these _OTHER placeholder columns.
See the Maintenance Plan Code help topic for instructions on ensuring you can activate this feature.
Instead of the column being strictly empty, one option is to have Shopkeeper fill in each row of that column with some fixed text. For example, if the website manager requires a CURRENCY column, you could fill that in with USD for each line. the WIDTHUNITS could be filled in with mm for each line.

A more advanced option is too fill in the column with dynamic information using a formula. It is not possible to provide instructions, but if the circumstances required it, Compulink may be able to provide a formula to use. For example, if a column were required for the alternative text data for a website image, you may want to use a copy of the description plus the price. In that case you would enter the Other Field Contents as @TRIM(DESCRIPT)+" "+TRAN(RETAILEACH)
Saving and Importing Configurations
In case you want to test out different export formats, or in case you want to export to different systems at different times, you can save a customized export column layout and load it back in later.


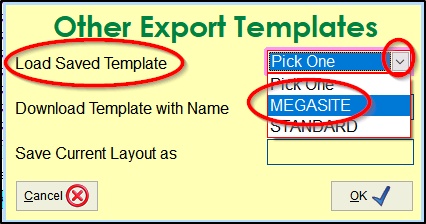
To save a layout, choose Options at the top left, then Open a Custom Export Template, and when the Other Export Template box appears, fill in the Save Current Layout box with a name and then choose OK.
 You could retrieve this at a later time by choosing Load Saved Template.
Note, however, that you do not have to load this each time. Whichever layout you created will remain in effect until you change it.
The Download Template with Name can be used if Shopkeeper has created a special export layout for you on a custom-programming basis.