Shopkeeper QuickBooks Export, or QB-Link can summarize sales and payables from Jewelry Shopkeeper and send them to your QuickBooks file. Other lists such as vendors, accounts and sales clerks can also be exported.
Each invoice from Accounts Payable is sent in summary form without all the inventory details. I.e. the invoice number, total, vendor and due date are sent to QuickBooks but not each Sku number on each invoice,
Sales figures are posted in QuickBooks as a single summarized general journal entry for each day of business. I.e. each individual sales receipt and each Sku number are not posted to QuickBooks but a breakdown of the account codes are sent
QuickBooks for Jewelers by David Geller Jewelry Shopkeeper QuickBooks Export is particularly helpful if you use the guidebook for jewelers by David Geller. This guide gives you a framework within which to organize your use of QuickBooks. For more information on this guide visit www.jewelerprofit.com
Simplified Instructions From the Settings page select the location of QuickBooks and Shopkeeper data From the Export page select the date range and select sales and/or Payables and click on the Start button.
Settings Tab The initial step is to setup file locations for both Shopkeeper’s data files and QuickBooks' .QBW files. Select the button “SETTINGS” to access the Shopkeeper Q-Link file locations.

Figure : Locations of QuickBooks and Shopkeeper Files
QuickBooks Filename The QuickBooks® file is likely to be on a local hard disk drive. The below example is for a QuickBooks® file called “StoreData.QBW”. Your file will likely be called something else.
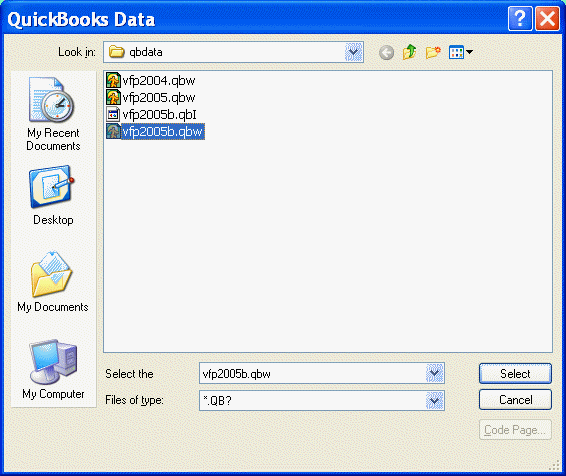
You can type the full file name or use the Lookup button. If you open your file in QuickBooks you may see the full name in the blue title bar like this D:\qbdata\vfp2005b.qbw

Figure : QuickBooks Filename
Otherwise you can click Lookup and select the file with the Windows File Finder.

Figure : Windows File Finder
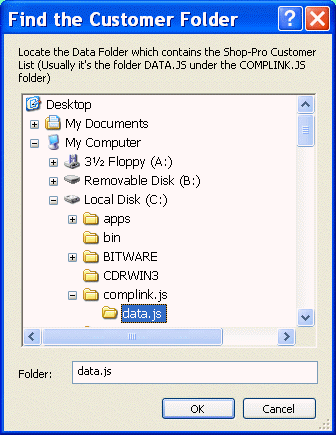
Folder for Shop-Pro Data With a single computer configuration Shopkeeper data is almost always found in C:\COMPLINK.JS\DATA.JS folder. If your computer is a workstation on a network the data is probably found in the F:\COMPLINK.JS\DATA.JS folder but could be elsewhere. If you are in doubt right-click the Shop-Pro icon on the Windows desktop and choose Properties, Program, and see the entry in the Working box.
If you choose the Lookup option for Shop-Pro data you will be selecting a folder where all Shop-Pro data files are – not an individual file.

Figure : Click Lookup button to search for Shopkeeper Data
Setup QuickBooks® Import Account Numbers
To understand how Shopkeeper Q-Link records a Journal Entry in QuickBooks® using the “Default QuickBooks® Account Numbers” refer to the QuickBooks® General Journal entry Figure 6: QuickBooks® Journal Entry Created by Shopkeeper

Figure : Shopkeeper QuickBooks® Link Defaults
Income Accounts
Income accounts are for the “Income” section on the QuickBooks® Profit & Loss Statement.
| • | Inventory: Sales from showcases of merchandise the store owns. |
| • | Memo: Inventory designated as MEMO merchandise in Shopkeeper. Only merchandise inventory received to an invoice designated with “MEM” at the start of the invoice number is considered Memo merchandise. |
| • | Special Orders: Sku no’s from sales entered using Enter a Special Order (choice 1,3) |
| • | Repairs: Sku no’s sold to major class categories designated as repair type 1 or 2 will be calculated as repair sales. |
| • | Appraisals: Sku no’s sold in major class categories designated as repair type 3 will be calculated as appraisal sales. |
Cost of Sales Accounts
Cost of Sales Accounts are for Cost of Goods Sold section on the QuickBooks® Profit & Loss Statement.
| • | The store’s cost for showcase inventory Sku no’s sold |
| • | The store’s cost for special order Sku no’s sold |
| • | The store’s cost for memorandum Sku no’s sold |
Asset Accounts
Asset accounts are for “Asset” section on the QuickBooks® Balance Sheet Statement.
| • | Inventory: Sales from showcases of merchandise the store owns. |
| • | Monies Received are cash, check and charge cards that are to be deposited to the bank. |
Liabilities Accounts
Liability accounts are for “Liability” section on the QuickBooks® Balance Sheet Statement.
| • | Sales tax collected |
| • | Sales Deposits are money collected on unfinalized sales (layaways, special orders) and money collected on credit slips/gift certificates. When the layaways are paid off or the gift certificate and credit slips are redeemed the customer deposits liability is reduced. Some days you’ll increase this liability account such as when you accept layaway deposits or sell gift certificates. Other days you’ll decrease this liability as you deliver layaway sales but receive only the small partial payment, or when a customer redeems a gift certificate. |
The default numbers provided are preferred, but you may change them.
QuickBooks General Journal Entry

Figure : QuickBooks® Journal Entry Created by Shopkeeper
For a more comprehensive explanation of how the general journal entry fits into the picture, refer to Geller’s QuickBooks for Jewelers guidebook.
Customize QuickBooks Accounts Based on Major Code In Jewelry Shopkeeper each Major Class code can have a different income and cost of goods account if you update the Major Class Code setup. Choose 8,3,1 – Press HOME to access the QuickBooks® account numbers.

Figure : Specify income / Cost of Goods accounts in Shopkeeper This means that you can direct the sales figures from repair major codes to a special income account in QuickBooks. Or you may choose to direct all the major codes for Loose Stones to a particular income account in QuickBooks. Likewise, the costs for each (inventory) major code can be organized.
More Settings

Figure : Fine tuning using More Settings
During export Shopkeeper Q-Link may find a record that has been previously exported to QuickBooks. On the More Settings page you can decide what should happen in those cases
Leave QuickBooks® alone means don’t change the record in QuickBooks® even though the data is different in Shopkeeper.
Update QuickBooks® from Shopkeeper means change the data in QuickBooks® to match the Shopkeeper information.
Update Shopkeeper from QuickBooks® means change the information in Shopkeeper to match the QuickBooks® data.
Conditional QB Update means that if you export a payable today and tomorrow you re-export it and it has been updated in Shopkeeper then the link program will update the QuickBooks copy provided that the QuickBooks copy has not been changed in the interim.
For example: If you export customers to QuickBooks and then later update the customer addresses in Shopkeeper, you would normally want to re-update the QuickBooks copy of those customers.
If you export vendor lists to QuickBooks and then normally modify vendor addresses in QuickBooks then you would want to leave the QuickBooks copy alone the next time you exported.
Start Export
Select the data to be exported by clicking the related checkboxes.
| • | Date Range to Export means |
| • | Restrict below ‘lists’ refers to the Customer, Vendor, Clerks and Chart of Accounts lists. Only data entered in the date range specified will be added and not the entire lists. |
| • | Customer adds Shopkeeper customer names to QuickBooks® |
| • | Vendor adds Shopkeeper vendors names to QuickBooks® |
| • | Clerks add Shopkeeper clerk names to QuickBooks® |
| • | Chart of Accounts add Shopkeeper chart of accounts codes to QuickBooks® |
| • | Daily Journal Entries adds one General Journal entry for each day of sales entered in Shopkeeper. |
| • | Accounts Payables add a “Bill” for the Payables entered in Shopkeeper. |
Click “Start Export” to begin the export process.

Figure : Set Export Selections
To reconcile the QuickBooks® Journal Entry created by Shopkeeper Q-Link with a Shopkeeper report, in Shopkeeper, select the Payment Spreadsheet report (choice 8,6,9). Compare results in figure 6 and Figure 10: Results from Payment Spreadsheet report -- Daily Sales ($336) with the Journal Entry (lines 4001 & 4004); Sales Tax ($4.75) with the line 1020; Monies Received (Cash, Check & Charge) with the four lines that include 1099.

Figure : Results from Payment Spreadsheet report
Update Jewelry Shop-Pro Files (one-time step)
In most cases, before you can successfully run QuickBooks Link you will need to update the data files in Jewelry Shop-Pro. This is a one-time step.
Start by trying to start an Export in Q-Link but the first time you may well see a prompt. “To add missing fields start Shop-Pro, choose File, Miscellaneous Settings, Utility Programs and run the utility called STRUC” If you see this prompt, simply start Jewelry Shop-Pro, make sure no other users are in the program and choose File, Miscellaneous Options, Utility Programs, select the STRUC utility, answer Yes when asked about backups (provided you have a backup from last night). This utility takes only a few minutes and then you can return to QuickBooks Link.
QuickBooks Integration Security (one-time step)
For the security of your QuickBooks files, QuickBooks does not allow other programs to update your QuickBooks data unless you authorize it.
The security questions may appear automatically on screen the very first time you try to export. If you set the security options wrong you may be able to correct them manually. See the Security II section below.
When you click the Export button the first time, Shopkeeper asks QuickBooks® for permission to update the .QBW data file. You must allow Shopkeeper access.
For the first time only, open QuickBooks® first. Open your QuickBooks company data file. Under the File menu Choice, choose Switch to Multi-user Mode.
When you click Export in Shopkeeper Q-Link, the following screens will appear. To allow Shopkeeper proper access to the files, make sure to click the proper access selections as indicated in figure 6 and 7.
Choose, “Yes, always; Allow access even if QuickBooks® is not running”

Figure : QuickBooks Security Clearance Request
Make sure to confirm your selection:

Figure : Confirm QuickBooks Security Permissions
QuickBooks Integration Security II You can adjust the security settings manually from within QuickBooks. Open your QuickBooks file in QuickBooks and set it to Single User mode. Choose Edit, Preferences and select the Integrated Applications option then click on the Company Preferences tab.

Figure : Security Preferences
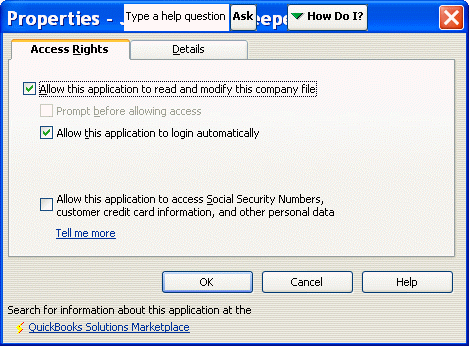
The Jewelry Shopkeeper entry should be in the list with a check in the Allow Access column. If you select the Properties button to see this screen you should have a check mark in the Allow this Application to Read and Modify this Company File and a check mark for Allow this application to Login Automatically.

Figure ; QuickBooks Security Properties